Deploying on Amazon EMR
Amazon Elastic MapReduce (EMR) is a web service for creating a cloud-hosted Hadoop cluster.
Dask-Yarn works out-of-the-box on Amazon EMR, following the Quickstart as written should get you up and running fine. We recommend doing the installation step as part of a bootstrap action.
For a curated installation, we also provide an example bootstrap action for installing Dask and Jupyter on cluster startup. This script is heavily commented, and can be used as an example if you need a more customized installation.
Here we provide a brief walkthrough of a workflow we’ve found useful when deploying Dask on Amazon EMR:
Configure the EMR Cluster
The EMR documentation contains an example showing how to configure and start an EMR cluster. We recommend referencing their documentation. A few notes on recommended settings:
- If you plan to use a bootstrap action, you’ll need to follow the
Go to
advanced options
link on theCreate Clusterpage - this feature is not available underQuick Options. - When chosing which applications to install,
dask-yarnonly requires a Hadoop installation, all other applications are optional depending on your workflow.
While this configuration can take some time and thought, the next time you want to start a Dask cluster on EMR you can clone this cluster to reuse the configuration.
Add a Bootstrap Action
To make installation on a clean cluster easier, we recommend scripting the installation as part of a bootstrap action. For a curated install, we provide an example bootstrap action that you may use. This script does the following:
- Installs miniconda.
- Installs
dask,distributed,dask-yarn, pyarrow, and s3fs. This list of packages can be extended using the--conda-packagesflag. - Packages the environment with conda-pack for distribution to the workers.
- Optionally installs and starts a Jupyter Notebook server running on port
8888. This can be disabled with the
--no-jupyterflag. The password for the notebook server can be set with the--passwordoption, the default isdask-user.
If you require a more customized install than this, you may wish to provide your own script. The example script is heavily commented, and should hopefully provide enough of a reference for your use.
To use the script, follow AWS’s documentation on using bootstrap actions. You’ll need to upload the script to an S3 bucket accessible to your project first.
Start the EMR Cluster
Once you’ve finished configuring your cluster, you can start it with the
Create Cluster button. This may take a while (~10 mins), depending on your
settings.
Connect to the EMR Cluster
Once the cluster is running, you’ll want to connect to it. Depending on your
EC2 security groups settings, you may have direct access to the cluster, or
you may need to start an ssh tunnel (default). For either of these you’ll need
to know the public DNS name of your master node. This address looks like
ec2-###-##-##-###.compute-1.amazonaws.com, and can be found by following
the AWS documentation.
Direct Access
If you have direct access to the cluster, you should be able to access the
resource-manager WebUI at <public-dns-name>:8088. If you used our provided
bootstrap action, the Jupyter Notebook should be available at
<public-dns-name>:8888.
Using an SSH Tunnel
If you don’t have direct access, you’ll need to start an SSH tunnel to access the Web UIs or the Jupyter Notebook. For more information, see the AWS documentation.
If you used our provided bootstrap action, the Jupyter Notebook should be
available at <public-dns-name>:8888, and can be accessed by starting a SSH
tunnel via:
$ ssh -i ~/mykeypair.pem -L 8888:<public-dns-name>:8888 hadoop@<public-dns-name>
where ~/mykeypair.pem is your .pem file, and <public-dns-name> is
the public DNS name of your master node.
Create a Dask Cluster
At this point you should have access to a running EMR cluster, with Dask and
its dependencies installed. To create a new Dask cluster running inside the EMR
cluster, create an instance of YarnCluster. If you didn’t use our
bootstrap action, you’ll also need to provide a path to your packaged
environment (see Managing Python Environments for more information).
from dask_yarn import YarnCluster
from dask.distributed import Client

# Create a cluster
cluster = YarnCluster()

# Connect to the cluster
client = Client(cluster)
By default no workers are started on cluster creation. To change the number of
workers, use the YarnCluster.scale() method. When scaling up, new workers
will be requested from YARN. When scaling down, workers will be intelligently
selected and scaled down gracefully, freeing up resources.
# Scale up to 10 workers
cluster.scale(10)

# ...

# Scale back down to 2 workers
cluster.scale(2)
If you’re working interactively in a Jupyter Notebook you can also use the provided graphical interface to change the cluster size.
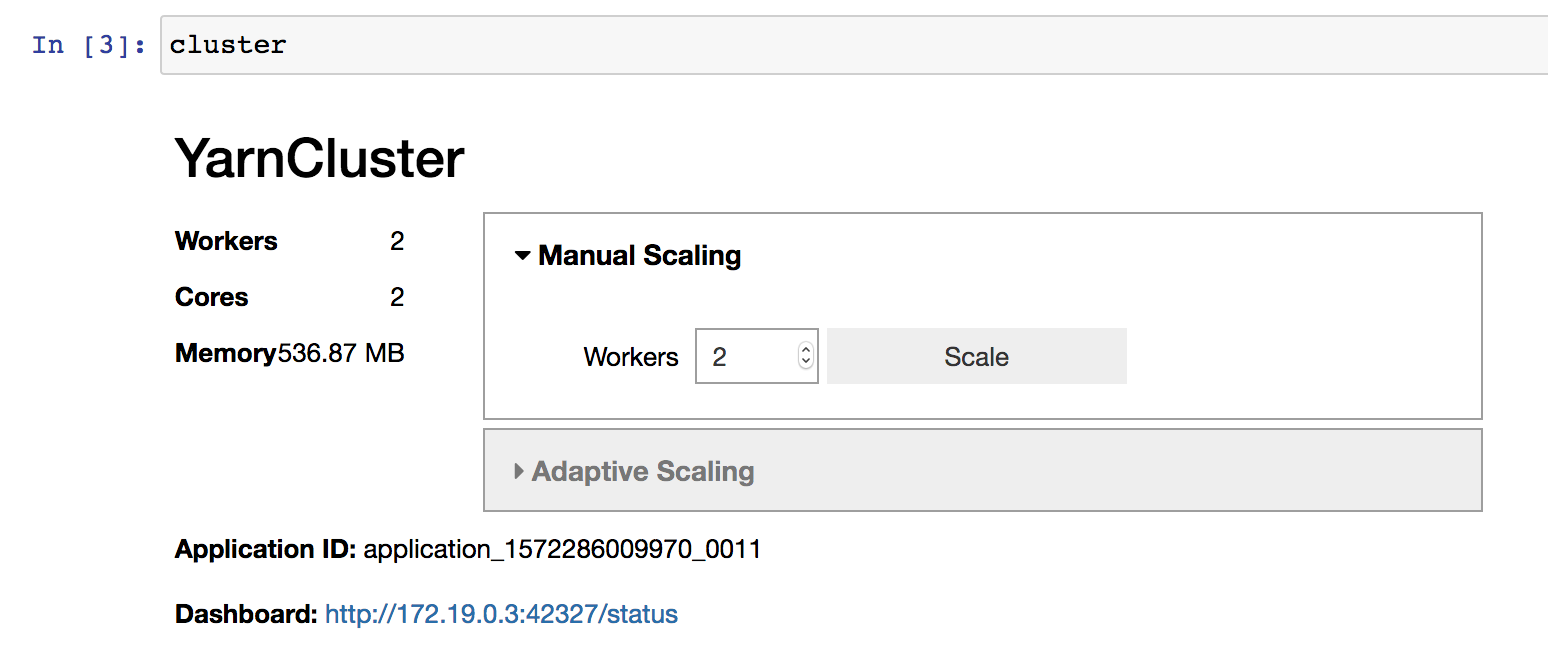
If you used our bootstrap action, the dask dashboard will also be available, and the link included in the cluster widget above.
Shutdown the EMR Cluster
You can start, scale, and stop many Dask clusters within a single EMR cluster. When you’re finally done doing your work, you’ll want to shutdown the whole EMR cluster to conserve resources. See the AWS documentation for more information.